Guide
How to Use a Dry Herb Vaporizer (From First Bowl to First Clean)
15 October 2026 • 11 min read
How to use a dry herb vaporizer step by step: charge, grind, pack, start at 180°C, draw slowly, step up, read the color, brush it out. Fixes by device type too.
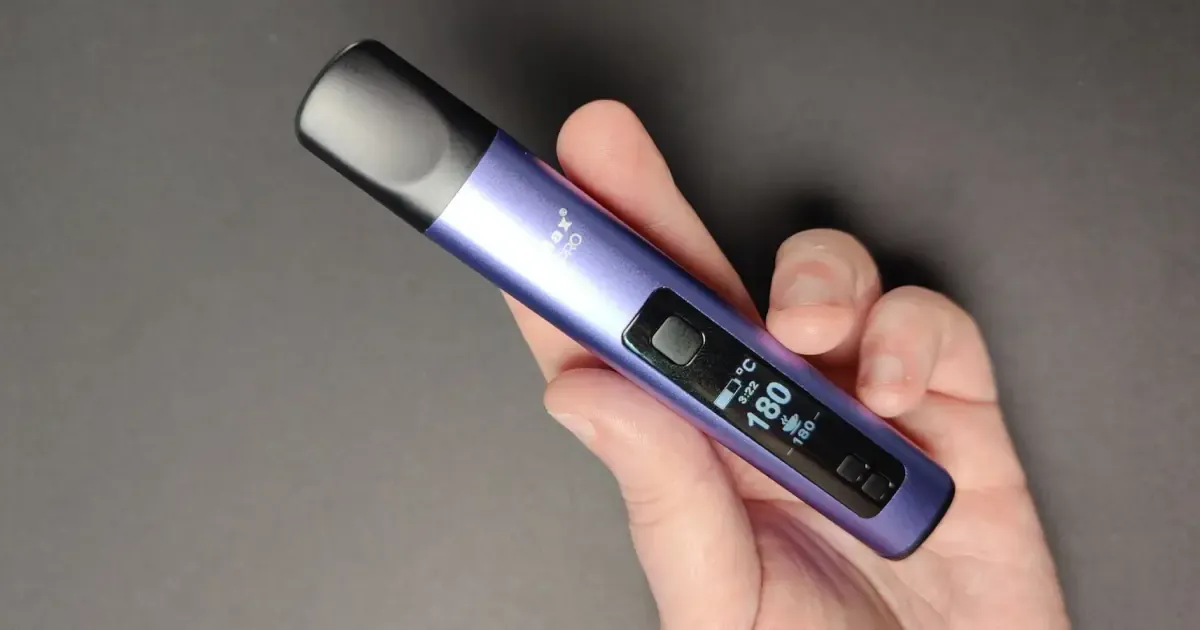
To use a dry herb vaporizer, charge it, grind a pinch of flower to a medium consistency, fill the chamber without crushing it, set about 180°C (356°F), and wait for the ready signal. Draw slowly for a few seconds, raise the temperature 5 to 10 degrees when the flavor fades, and stop once the herb has turned an even medium brown. Then tip it out and brush the chamber while it's still warm.
That loop holds on nearly every device; what changes is how long you draw and how the heat is delivered. If you're here to learn how to vape weed without a cartridge, this is that guide: flower only, not nicotine e-cigarettes or 510 oil carts. It runs one session from unboxing to cleanup and links the deeper guide for each step. We've reviewed devices in every class here, including the PAX 3, three DynaVaps, the XMAX V3 Pro and the Arizer XQ2.
Contents14 sections
- What You Need Before the First Session
- Step 1: Charge It and Run a Burn-Off
- Step 2: Grind to a Medium Consistency
- Step 3: Pack the Chamber
- Step 4: Pick a Starting Temperature
- Step 5: Heat Up and Take the First Draw
- Step 6: Step the Temperature Up as the Flavor Fades
- Step 7: Know When the Bowl Is Done
- Step 8: Empty, Brush, and Clean on a Schedule
- How the Steps Change by Device Type
- A First-Session Script
- Quick Troubleshooting
- Is a Dry Herb Vape Better for Your Lungs?
- Frequently Asked Questions
What You Need Before the First Session
- The vaporizer, fully charged. A flat battery heats slowly and can sag mid-bowl.
- A grinder. Any two or four piece metal grinder will do.
- The pick or brush from the box. For stirring mid-bowl and cleaning after.
- Flower that's dry but not dusty. Damp herb makes weak vapor; bone-dry herb turns harsh fast.
Step 1: Charge It and Run a Burn-Off
New electric vaporizers can carry traces of machining oil and often smell of warm plastic at first. Charge fully, wipe the chamber and mouthpiece with an isopropyl swab (damp, not dripping), then run it empty at its top setting for about ten minutes, until the smell is gone. It's a once-per-device job, covered in our guide to preparing a new vaporizer. A DynaVap skips it.
Step 2: Grind to a Medium Consistency
Grind right before you vape, and only what you'll use. Aim for medium, roughly the texture of dried oregano. Then adjust for the device: conduction ovens like the PAX want it a little finer and packed firm, while glass-screen devices like Arizer's want it coarser so nothing falls through. Our guide on how fine to grind has the maker advice by device.
Keep the first load small. Chambers in our catalog run from about 0.1 grams in a DynaVap tip or an XMAX V3 Pro to 0.35 to 0.5 grams in a PAX 3 oven.
Step 3: Pack the Chamber
Fill the chamber to the top and level it off. In a conduction oven, press gently so the herb sits against the hot walls. In a convection device, keep it even but uncompressed, because the air has to get through.
Then do a dry pull before heating. You want light, smooth resistance; a draw like a coffee stirrer means loosen it. A DynaVap tip is the exception, about three-quarters full and loose. The full method is in how to pack a dry herb vaporizer.
Step 4: Pick a Starting Temperature
Start at 180°C (356°F): warm enough for visible vapor, cool enough that you still taste the flower.
| Setting | What you get | Use it for |
|---|---|---|
| 160 to 175°C (320 to 347°F) | Thin vapor, the most flavor, light effects | Tasting a new strain, or the first draws of a bowl |
| 180 to 190°C (356 to 374°F) | Visible vapor, clear flavor, effects building | A first session |
| 195 to 210°C (383 to 410°F) | Denser, warmer vapor, flavor fading, the strongest effects | Finishing a bowl |
| 215 to 220°C (419 to 428°F) | Harsh and toasty | The last draw or two, if at all |
| 230°C (446°F) and up | Combustion | Never a target |
The combustion line comes from the Cal NORML and MAPS bench test, which found THC in vapor at 185°C (365°F), significant benzene from 200°C (392°F), and combustion around 230°C (446°F). Most portables stop between 210 and 220°C for that reason. Our guide to what temperature to vape flower covers each range.
Not every device has a dial. The PAX 3 and PAX Plus use presets starting at 182°C (360°F), so pick the lowest. A DynaVap has no setting at all: the cap clicks at about 240°C (the cap, not the herb) and you stop heating when it does.
Step 5: Heat Up and Take the First Draw
Wait for the ready signal. A Mighty+ vibrates, a PAX 3 buzzes once as its petals turn from purple to green, and a DynaVap clicks. An on-demand device like the Tinymight 2 skips the wait: you hold the button and draw at the same time.
Draw slowly and steadily: three to five seconds on a conduction oven, longer on convection, with the button held throughout on an on-demand device. Breathe it in and out; holding vapor adds nothing. Our guide to inhaling from a dry herb vaporizer has draw lengths by device class and fixes for coughing.
Warning: Take two draws, then wait ten minutes before deciding on more. In a 2018 Johns Hopkins crossover trial of adults who rarely used cannabis, the same THC dose produced stronger effects and higher peak blood THC vaporized than smoked, with blood levels peaking within 30 minutes.
Step 6: Step the Temperature Up as the Flavor Fades
When the vapor thins and the taste goes flat, raise the setting 5 to 10°C (about 10 to 20°F). Flavor lives at the low end and the strongest effects near the top, so stepping gets you both from one bowl.
On a conduction oven, stir halfway through. Our PAX 3 review flagged exactly this: herb in the middle heats less than herb touching the walls.
Step 7: Know When the Bowl Is Done
Check the color once the vapor thins out:
| What you see | What it means | What to do |
|---|---|---|
| Still mostly green | Barely extracted | Step up or keep drawing |
| Light tan with some green | Partly done, most flavor gone | Stir and step up once more |
| Even medium brown | Finished for most people | Empty it |
| Dark brown or black, burnt smell | Too hot, too long, or combusting | Start lower next time |
| Brown edges, green middle | Uneven heating | Stir mid-bowl, pack more evenly |
Storz & Bickel's Mighty+ instructions say a load can keep going until no vapor forms at maximum temperature, but that for flavor you should replace it sooner. We'd stop at medium brown. Our guide on when to refill your vaporizer covers the popcorn taste and the half-green bowl. Keep the spent herb in a jar; the heat has partly decarboxylated it for edibles.
Step 8: Empty, Brush, and Clean on a Schedule
Tip the bowl out while the chamber is still warm and brush it; warm residue lifts off, cold residue sets. Swab the mouthpiece every few sessions, and if you vape daily, soak the removable glass and steel parts in 90 percent or stronger isopropyl every week or two. Never soak the electronics. The step-by-step is in how to clean a dry herb vaporizer.
How the Steps Change by Device Type
Heat-up times are from our catalog and timers from the makers' manuals. Draw counts are rough ranges, not specs; draw length and temperature move them a lot.
| Device class | Example | Heat-up | How a bowl runs | Rough draws per bowl |
|---|---|---|---|---|
| Session, conduction | PAX 3 | Under 30 s | Holds temperature; lip sensing adds heat while you draw | 8 to 15 short sips |
| Session, hybrid | Mighty+ | About 60 s | Holds temperature; switches off 3 minutes after the last use | 8 to 12 |
| Session or on-demand | XMAX V3 Pro | 15 to 30 s | 4 or 6 minute session timer, or heat while the button is held | 5 to 10 |
| On-demand, convection | Tinymight 2 | About 3 s | Heats only while you hold the button | 4 to 8 long draws |
| Battery-free, torch | DynaVap M 7 | A few seconds of flame | 20 to 30 seconds of vapor per heat | 2 to 4 heat cycles |
| Desktop, balloon | Volcano Hybrid | About 40 s to 180°C | Fills a bag you draw from at your own pace | 2 to 4 balloons per fill |
Session vs On-Demand
A session device keeps the whole load hot, so the bowl cooks between draws too; take your draws within a few minutes. An on-demand device heats only during the draw, so one pack stretches across separate moments but asks for better technique. Session vs on-demand vaporizers covers the trade-off.
Conduction vs Convection
Conduction heats the herb through the walls: shorter sips, a firmer pack, a stir mid-bowl. Convection uses hot air: a looser pack, a grind set by the screen, and long slow draws, because your breath carries the heat through. Most portables are hybrids in between; convection vs conduction explains how to tell. PAX ovens are conduction with presets, and how to use a PAX covers each model.
DynaVap and Desktop Vaporizers
On a DynaVap, heat the cap while rotating it, stop at the click, draw, and wait for the second, cooling click before heating again. DynaVap's how-to page puts a bowl at two to four heat cycles, and our DynaVap guide covers torch technique.
A desktop follows the same steps through a bag or a whip. Storz & Bickel's Volcano Hybrid manual says to fill only what you'll inhale within ten minutes, because vapor condenses on the balloon. Our guide to using a Volcano vaporizer covers balloons, valves and the tube.
A First-Session Script
- Grind about 0.15 grams just before you start.
- Pack it and dry pull.
- Set 180°C (356°F) and wait for the ready signal.
- Take two slow draws, breathing out normally.
- Wait ten minutes before deciding on more.
- Go to 190°C (374°F) for two to four more draws, stirring first in a conduction oven.
- Finish at 200°C (392°F) and stop when the vapor thins.
- Tip it out, brush it warm, and note the setting and amount so the next session starts from there.
Quick Troubleshooting
| Problem | Likely cause | Quick fix |
|---|---|---|
| No vapor, or very thin vapor | Temperature too low, coarse grind, loose pack | Step up 10°C, grind finer, repack and dry pull |
| Harsh or hot | Temperature too high, fast draws, very dry herb | Drop 10 to 15°C and slow the draw |
| Burnt taste | No burn-off on a new device, or resin build-up on an old one | Burn off, or deep clean the chamber and vapor path |
| Hard to draw | Overpacked, or a clogged screen | Loosen the pack, then clean or replace the screen |
| Green middle, brown edges | Uneven conduction heating | Stir mid-bowl |
When the fix isn't obvious, work through our no-vapor troubleshooting guide in order. Blinking lights usually point to the battery, temperature or a sensor, and vaporizer blinking lights and error codes decodes them by brand.
Is a Dry Herb Vape Better for Your Lungs?
Compared with smoking, the evidence leans in its favor. Compared with inhaling nothing, no vaporizer is a health product.
The smoking side is fairly solid. The National Academies' 2017 review found substantial evidence linking long-term cannabis smoking to worse respiratory symptoms and more frequent chronic bronchitis episodes, and moderate evidence that symptoms improve after people stop smoking. Vaporizers weren't part of its formal conclusions.
The vaporizer side is thinner. In an 18-person inpatient study using a Volcano, vaporizing matched a joint's THC blood levels while reducing exhaled carbon monoxide. A large online survey found vaporizer use predicted fewer self-reported respiratory symptoms. Encouraging, not proof: one is a pilot study, the other a survey. And the benzene finding at 200°C is a reason to keep most of a session below that.
Don't lump flower in with cartridges. The CDC strongly linked the 2019 EVALI lung injury outbreak to vitamin E acetate in THC-containing liquid products, mostly from informal sources. A dry herb vaporizer heats plant material with nothing added. For the strength side, see whether vaping is more potent than smoking.
Note: Nothing here is medical advice. If you have asthma or another lung condition, ask your doctor before inhaling anything.
Frequently Asked Questions
How hot should I set my dry herb vaporizer?
Start at 180°C (356°F), step up 5 to 10 degrees as the flavor fades, and finish around 200 to 210°C (392 to 410°F). Anything approaching 230°C (446°F) is close to combustion.
How many hits do you get off a dry herb vape?
It depends on chamber size and draw style. Roughly, a 0.25 to 0.5 gram session oven gives 8 to 15 draws, a small convection bowl 4 to 10, and a DynaVap two to four heat cycles. Stop when the vapor thins and the herb is medium brown.
What are the downsides of using a dry herb vape?
The upfront cost, a learning curve, charging and regular cleaning. Vapor can also feel stronger than a joint at the same dose, so start smaller. It smells far less than smoke, but it isn't odorless.
Do you need to clean a dry herb vaporizer after every use?
Brush out the chamber after every session; it takes under a minute. A full isopropyl clean every week or two suits most daily users, sooner if the draw tightens.
Can you use oil carts or wax in a dry herb vaporizer?
Not 510 oil cartridges, which need a 510 battery. Some dry herb vaporizers take a little concentrate on a pad or insert made for the job, but wax smeared into a flower chamber gums up the screens.
About the author
Practical context from the editor behind this guide.